An in-depth review of the Celestron NexStar 130 SLT
by Ian Morison, Jodrell Bank Observatory
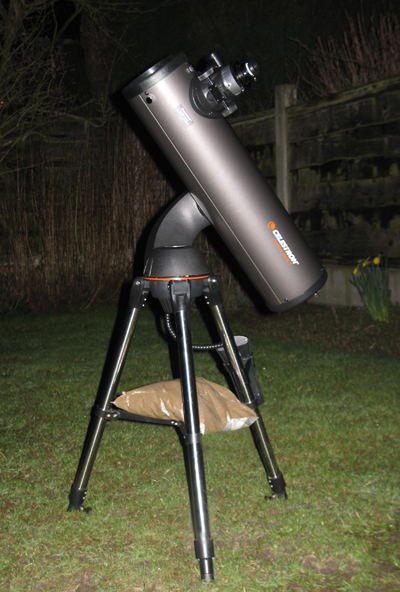
The Celestron NexStar 130 SLT

The Spider Assembly
1) It came with a thin steel vane spider. The four arms of the spider support the secondary mirror. They are made of thin steel tensioned by screws around the optical tube. This is far, far better than the thick metal vanes that I have seen on several 114 mm Newtonians and less image degradation will result as a consequence.
2) The focuser came with adapters for both 1.25 inch eyepieces AND 2 inch eyepieces. Though the scope comes with two 1.25 inch eyepieces it does mean that for wide-field views a 2 inch eyepiece of 30 to 40 mm focal length could be used.
3) It was provided with a "red-dot" finder. As we will see below, the finder is hardly used except when initially aligning the scope. A red dot finder appears to project a red dot on the sky which is aligned with the target star or planet. For this purpose they are vastly better than the cheap 6 x 30 (which in practice are sometimes stopped down to nearer 10mm) straight through finders. The finder has a quick release mount.
4) Reasonable looking quality 25mm and 9 mm eyepieces. The 25mm eyepiece gives a magnification of just x26 (650/25) and has a field of view of ~2 degrees. The inside of the barrel close to the field lens was a plastic retainer. This is rather shiny and hence might reduce the contrast somewhat when viewing the Moon. It would be easy to apply some mat black paint, perhaps mixed with a little sand, to give a rough surface.
The 9mm eyepiece gives a magnification of x72 (650/9) with a field of view of ~0.6 degrees - just nicely encompassing the Full Moon! This equates to a apparent field of ~ 44 degrees - rather less than a Plossl. Their performance will be described below.
So far, very good. Observing ones eye (reflected in the secondary and primary mirrors) through the eyepiece indicated that the collimation was very close to perfect (and has not had to be adjusted). A small ring on the centre of the primary mirror helps to carry out collimation if necessary.
1) The mounting bracket for the finder was a little out of alignment and so one of the adjustments on the finder itself had to be at the extreme of its range to align it to the scope. A tweak with a phillips screwdriver on the bracket screws fixed this.
2) I suspect that the secondary mirror was glued a little off its correct position - being a touch too far away from the eyepiece. (It is meant to be a little further to that side, but not as much as I observed. This would have rather little consequence though.)
3) The inside of the tube is, as it should be, matt black but I have seen "blacker" blacks.
We will see how the telescope performed in practice below.
Due to the Alt-Az mount and the length of the optical tube assembly there is bound to be a region around the zenith (directly overhead) that cannot be accessed by the telescope. The telescope will not attempt to drive to an elevation which might cause the bottom of the telescope tube to foul the mount or tripod. The software in the computer contains an altitude slew limit of 65 degrees which I suspect is a little conservative. I have seen a nice modification to the mount which interposes a plastic tube between the tripod and the base of the mount. By lifting the mount away from the tripod, the highest elevation can be substantially increased. This will require some do-it-yourself work, but could well be worth it. Perhaps some accessory company might produce one as I suspect that there will be a lot of these scopes sold!
The mount uses a single fork rather than the two forks used in most Alt-Az mounts. This obviously limits the weight that can be supported - to around 5kg. More obviously, it does allow the tube, if pushed sideways, to move significantly more than if a dual fork were used. But it always came back to where it was before so this is not really a problem and really, one should not touch the tube anyway except to adjust the focuser. Having touched the focusser, the tube does "shimmer" a little - rapid, very small amplitude vibrations that take a few seconds to damp down. I have not noticed on any other scope but then I have never used a lightweight single fork mount before. However this really does not constitute much of a problem in practice. I noticed this more when the scope was mounted on concrete rather than (very soggy) grass. I suspect that the grass helped to damp things down somewhat. One can buy damping pads of squigy plastic and these might well help.
The cover on the base of the mount opens to allow the insertion of 8 AA batteries in two packs of 4. It is stated that one set should last for ~ 8 hours. What pleased me greatly was that the mount appeared to work fine with a set of rechargeable NiMH batteries even though their nominal voltage is a little less. There is a socket to provide an external 12 volts from a mains adapter, car lighter socket or external battery. (These are all additional accessories.) There is a recessed (good) on/off switch, the socket for the hand controller to plug in and an accessory port. The hand controller/computer is Celestron's latest which allows for the software to be updated and, most importantly, includes the clever software that allows SkyAlign to work. The mount came already mated to its tubular tube stainless steel tripod. This is certainly better than the aluminium tripods that have been used on this class of telescope before but it is still very light. I have often advised owners to fill their aluminium tripods with sand both to increase stability and to improve the damping of the system. The steel legs are riveted so it is not easy to fill them with sand so, instead, I placed a small sack of sand on the tripod spreader to give a similar result at least as regards stability. A bubble level is incorporated into the base so the mount can be levelled but, as we will see, if SkyAlign is used, levelling the mount is not too critical.
The tube assembly attaches to the fork using the widely used "Vixen" standard wedge shaped plate. In principle this would allow other optical tubes to be fitted provided they are not too heavy. I have 4 telescopes with this type of mounting plate and only one would, in fact, fit. The plate has to be slid into the clamping bracket from the side - not lifted in as is usually done on the Vixen GP clones. Many of the plates do not have the correct profile along their entire length so cannot be slid in from the side as is required on the SLT mount. One may thus need to remove some metal from the mounting plate before it could be used on the SLT.
I was asked to use the red dot finder to point to a first bright object. (I use the word "object" as bright planets and even the Moon may be used.) I chose an object high in the West (I knew it was the star Capella but I didn't need to know this.) Using the red dot finder, four keypads are then used to drive the telescope up/down and clockwise/anticlockwise to move the tube. When the red dot appeared over the star I pressed "Enter". You are then asked to centre it in the field of view of the telescope. The computer automatically reduces the slewing speed at this point. When centred in the field I pressed the "Align" pad. I was then asked to slew the telescope to a second object and, in the same way, I aligned it on a very bright object low in the South (Sirius, as I suspect you might have guessed!). One should try to get at least 90 degrees between the objects so this seemed a reasonable slew. It's also best not to use objects in a straight line. Through the murk I could see a bright object up to my left. When I aligned on it and observed it in the low power eyepiece I realised it was the planet Saturn! (I should have known that it was Saturn, but it was difficult to get ones bearings with so few stars visible. This did prove that, just as Celestron say, planets can be used as well as stars and at least for this object I did not initially know what it was that I was aligning on - a great bonus for real beginners.)
The computer then sat for a while thinking and then came up with the magic words "Match Confirmed". It had worked first time out of the box!
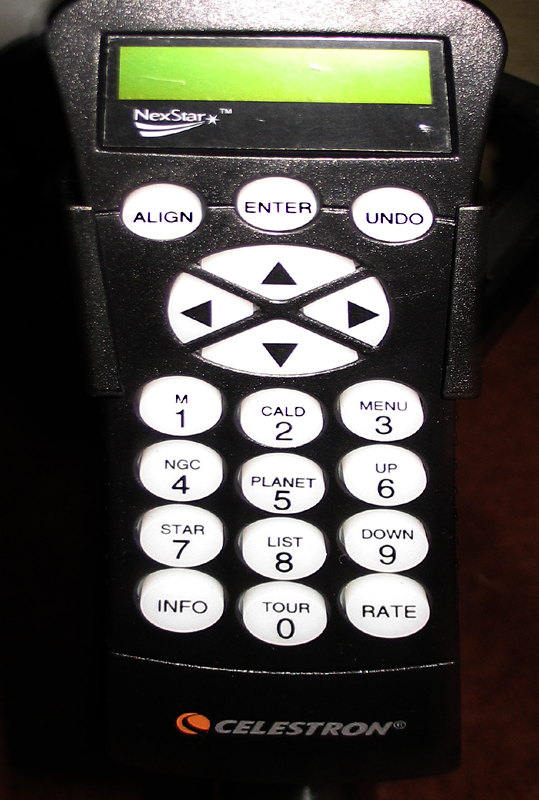
The Hand Controller
That was it. By pressing the "Undo" key I would have been told the three objects I had chosen: Capella, Sirius and Saturn. But I was away. The numeric keys have letters or words on them relating to the various catalogues held in the computers memory. These are:
1) M: The Messier Catalogue of just over 100 objects. This is the one that most observers will initially use for seeking out "deep sky" Objects.
2) Cald: This is the Caldwell Catalogue named after Patrick Caldwell-Moore. It also contains just over 100 deep sky objects and includes objects in the southern hemisphere as well.
3) Planet: Lists the Moon and the planets visible in the sky at the time of observation.
4) NGC: Deep Sky Objects in the New General Catalogue. Mostly Galaxies. Many of these will be rather faint for this sized telescope. One that should be easily visible is NGC 2903, a nice 9th magnitude galaxy in Leo. I am surprised that it was missed out by Messier and it is not included in the Caldwell catalogue either.
5) Star: The brightest stars in the SAO ( Smithsonian Astrophysical Observatory.) catalogue.
6) Tour: Takes you on a tour of the best objects in the sky at the time of observation.
7) List: Accesses a set of object lists such as named stars and named objects. (For example Sirius and the Dumbbell Nebula). Selecting from the Constellation list gives the objects seen in each constellation.
The manual states that 4000 objects are included. Some objects occur in two or more lists such as, for example, "The Eskimo Nebula", a planetary nebula which is in the list of named objects. This is also Caldwell 39 and NGC 2392.
I hit the pad with the letter M on it and I was shown "Messier" with a three digit number to key in. I keyed in 042- the Orion Nebula - and hit "Enter". Down and clockwise it slewed. I could not make out the nebula (remember I could not even see the three stars of Orion's belt with my eyes) but I could see the line of three stars and the 4 stars of the trapezium at its heart. Their images were nice and crisp - my first intimation that the optics were fine. As sometimes happens, when the sky transparency is worst, the "seeing" can be very good - that is, the atmosphere was very steady. It was that night so making it excellent for testing the optics of the scope. I then had a quick look at the clusters in Auriga: M36, 37 and 38. All appeared in the field of view though were barely visible through the haze. Then up to M35 in Gemini. Nicely centred in the field and more obvious than the Auriga clusters as this part of the sky was clearer. Then across to Cancer to first, M44, the Beehive Cluster, and finally back to Saturn. The image was very clean and focus was easy to find. Again, indications of a good mirror and collimation. However the 9mm eyepiece (at x72) could not really give enough magnification to see Saturn at its best and so I added a Televue x2.5 powermate into the focusser to give x180. During moments of very good seeing I could see the Cassini division and possibly a hint of a band around the surface of Saturn - by this time the skies were clearing somewhat. The optics of this scope are clearly up to the mark!
So the first accessory that a purchaser should buy is a x2 Barlow. Used with the 9mm eyepiece, this will give the effect of a 4.5mm eyepiece and be much easier to use than 4.5mm eyepiece as well as giving you an effective focal length of 12.5mm when used with the 25mm eyepiece.
My final move was back to Capella to do a little star testing - comparing the intra and extra-focal images. There was a trace of spherical aberration but nothing to get excited about and I suspect that the mirror was nearer to 1/6th wave rather than the nominal standard of 1/4 wave.
Sometimes a mirror can have a good overall figure, but a rough surface. It is said that this reduces the contrast of the rings seen in the out of focus image. They looked fine to me. Overall I rate the the mirror as excellent - and definitely better than I was expecting in a budget scope.
Lets have a look at the innovative method that this telescope can use for alignment. The computer asks the observer to align the scope onto three bright objects.
Given the approximate location, the date and time and with a roughly level mount the computer "knows" the area of sky in which the three objects must be located. This reduces the time for its calculations to determine which objects have been selected by the observer as it can eliminate many possibilities. Again, given the date and time it knows the positions of the Moon and planets on the sky so that they can be used too.
By aligning on three objects it has three sets of azimuth and altitudes. From these, it can calculate the angle between each pair of objects. All the objects must be greater in magnitude than 2.5 so from its catalogue of stars it will then first check which possible pairs of objects have been selected. Given three such pairs, it is extremely unlikely that the correct set of three objects cannot be found.
The computer has made 6 measurements (3 azimuth and 3 Altitude) so it is then able to solve for the position of true north and the two numbers which define the tilt of the mount away from the horizontal. It thus knows all that is needed to compute the azimuth and altitudes of other objects in its catalogue. Brilliant! I particularly like the fact that it allows you to select the objects. I often try to observe when the sky is partially cloud covered. One can simply choose the objects that one can see at the time provided they are reasonably far apart in the sky.
If you just take things gently there is no real problem.
The results for the 25mm were much as I had expected - some lateral colour and some drop off in image quality near the edge of the field, but fine in the centre. Simple eyepieces can actually be better than more complex ones in the field centre as less glass is in the way and are thus often recommended for planetary observations. The celestron Ultima was fairly obviously better - but so it should be, costing ~ 1/3 the price of the whole telescope! It would have been nice if Celestron bundled their 26mm E-Lux budget plossl with the scope.
However, I found it very hard to criticise the 9mm eyepiece. Ok, it had a somewhat smaller field of view than the Vixen, but optically I couldn't really fault it. It gave some really nice views of the first-quarter Moon which nicely filled the field of view.
Well at least it shows that some astrophotography is possible with the 130 SLT!
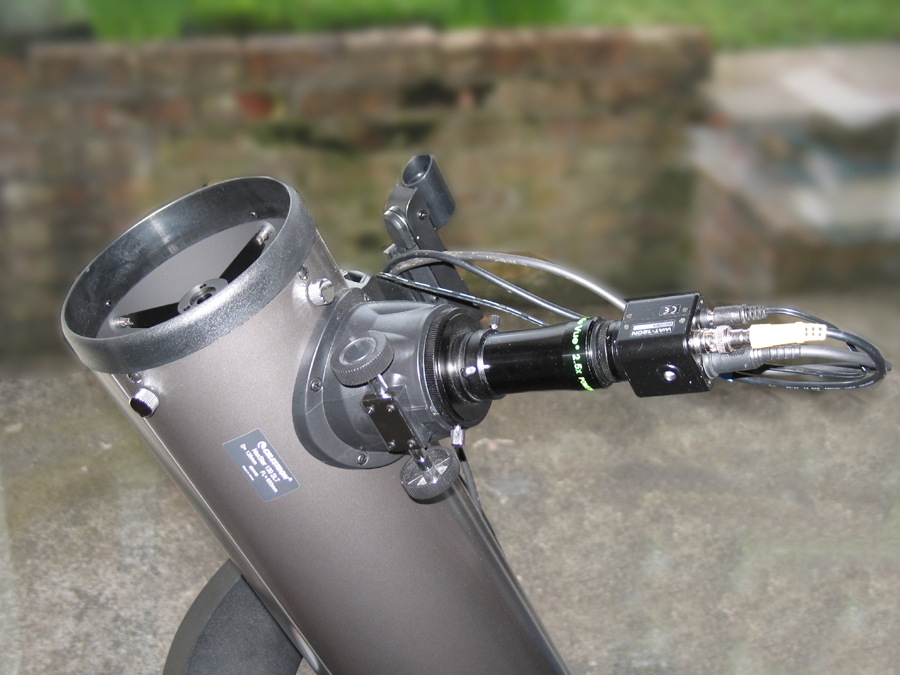
Televue 2.5x Powermate and Watec 120N astrocam.
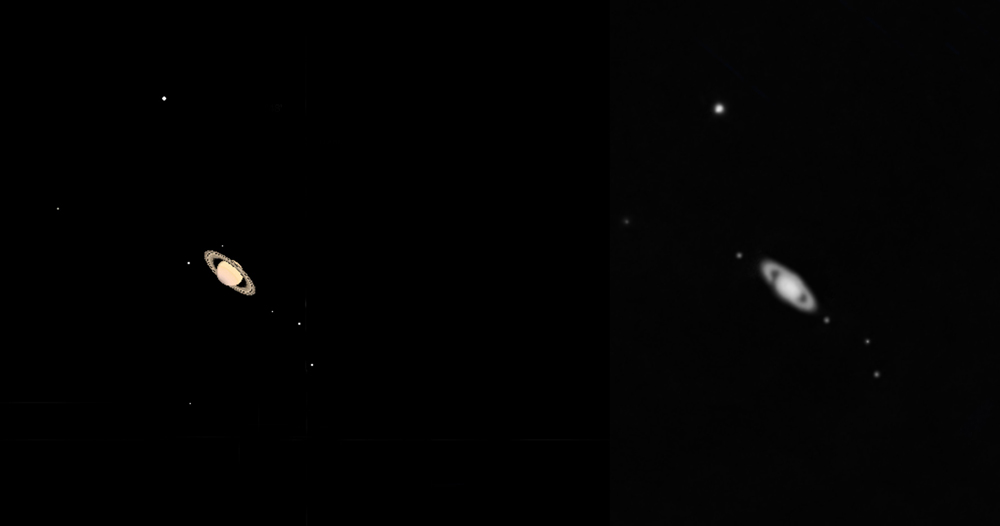
Two images: left,Cartes du Ciel plot and right, Saturn plus Moons composite.
The second was a piece of software that would allow you to control the telescope from a laptop or computer given a suitable connecting cable which can be bought as an accessory.
What more can one ask for? I believe this and the other telescopes in the Nextstar range will be able to painlessly introduce many newcomers to the night sky. They deserve to sell in large numbers and Celestron are to be congratulated not only in coming up with a brilliant way to align a computerised scope but providing this new software in a worthwhile aperture scope at a very reasonable price. Well done!
Then I would then be inclined to buy a 2" eyepiece for "rich field" scanning of star fields - and a wonderful view of the Pleiades. The Moonfish 30mm 80 degree apparent field of view was very well reviewed recently. I have one and am very happy with it. The tube can support it.
Finally I would look out for a ~25mm plossl eyepiece - to replace the weaker of the two provided with the scope.
102mm Takahashi Apochromatic Refractor.
127mm Alter 500 Maksutov.
150mm Helios Achromatic Refractor
150mm Meade Schmidt-Newtonian
200mm Orion Optics, UK, Newtonian Reflector
235mm Celestron Schmidt-Cassegrain.