An in-depth review of the Astronomica 80mm ED Refractor
by Ian Morison, Jodrell Bank Observatory
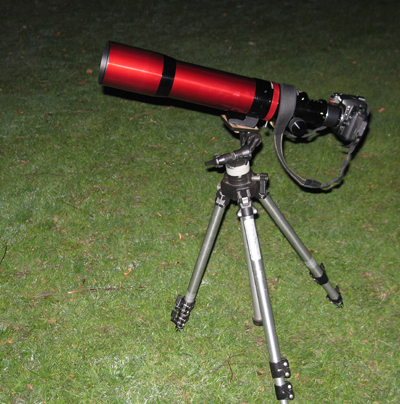
The Astronomica 80mm ED refractor
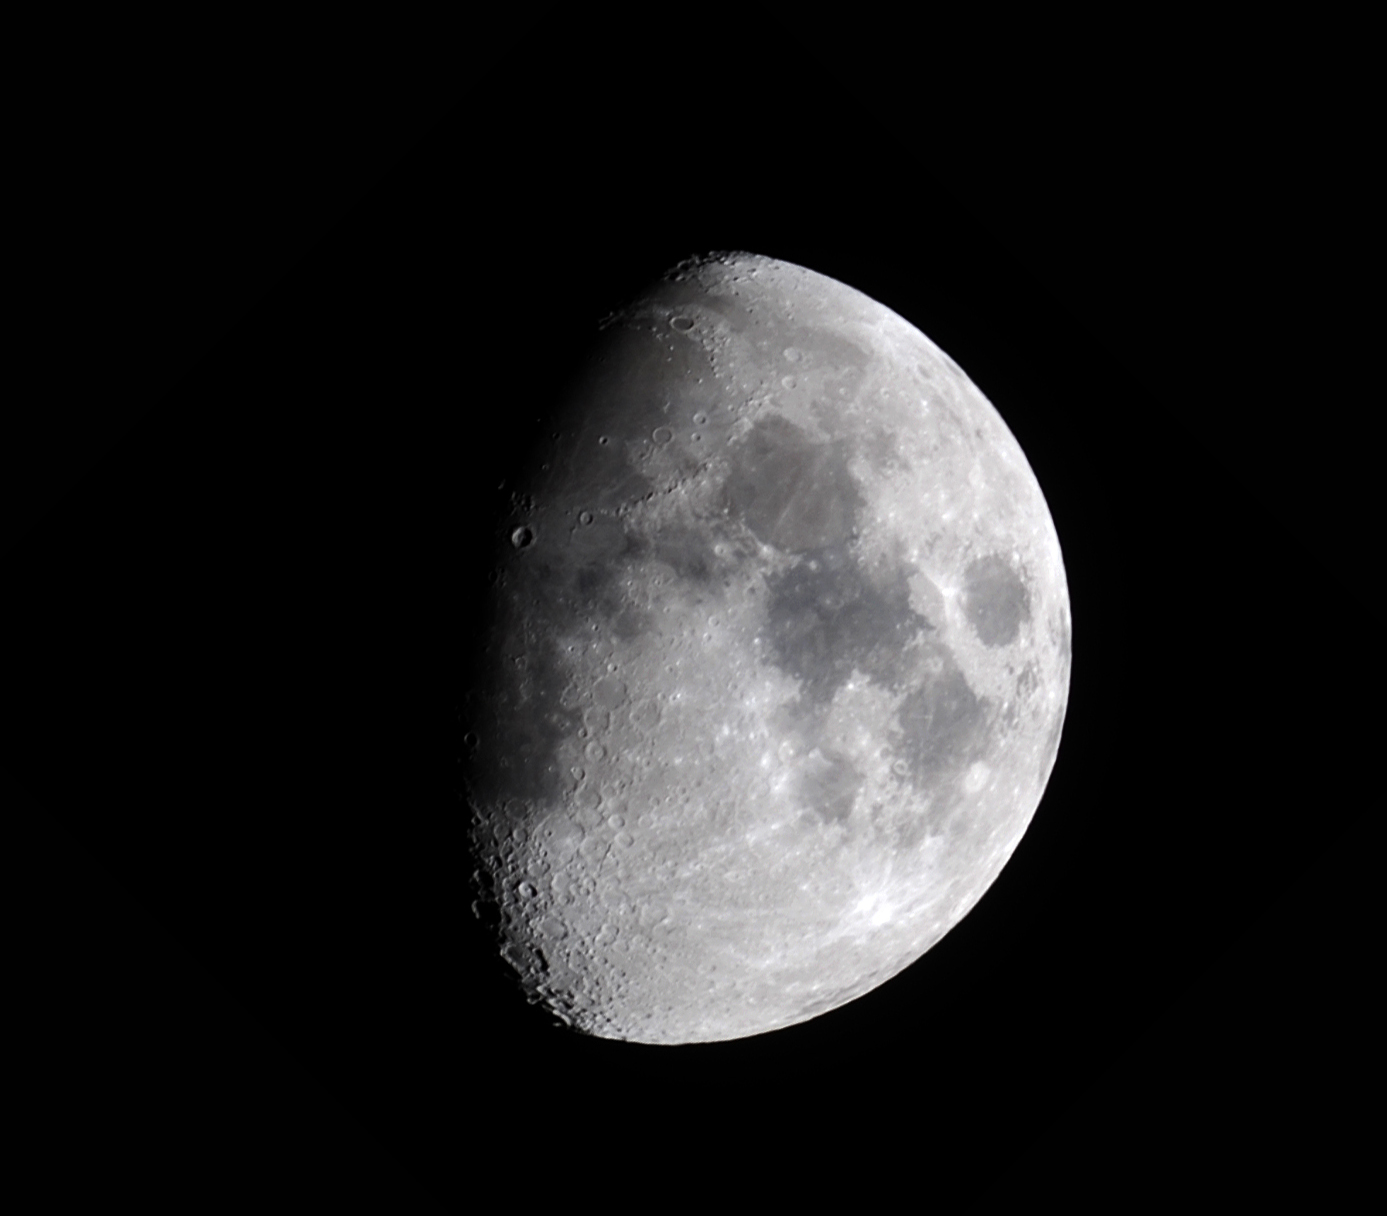
With Nikon D80 imaging the Crescent Moon on 20th April 2007
Image: Ian Morison
A value for money "Rich Field" telescope
Anyone who keeps an eye on the equipment available for amateur astronomers can hardly have missed the fact that there are now quite a variety of 66 mm and 80 mm refractors available. As they have short focal lengths, typically 500 to 550 mm, they can provide a stunningly wide (~5 degrees) field of view given a suitable eyepiece. At an astronomy convention lecture at Cambridge in March 2007, one of the UK’s top astro-photographers, Nick Szymanick, pointed out that such telescopes allied to a camera could produce some very nice wide field images. I had just acquired a Nikon D80 and made a mental note to myself to investigate these telescopes further. Later that day I discovered that “Astronomica” were selling quite a number of items from a stall at the convention – amongst which was an 80 mm “ED APO” telescope. It looked very well made and exuded quality with its highly polished anodised metal surfaces and two speed “Crayford” type focuser which could accept 2” eyepieces and came with a 2 to 1.25" adapter.
From later “research”, I discovered that the Astronomica ED-80 is made in Taiwan by a firm called Long Perng who I suspect are behind many of this type of telescope. The address of the company is rather wonderful: 6, Alley 73, Lane 244, Hsin-Shu Road, Hsin Chuang, Taipei 242, Taiwan. This rather implies a little back street workshop, but the firm was founded in 1974 and has quite impressive premises. The ED 80 has the Long Pergn logo on the side.
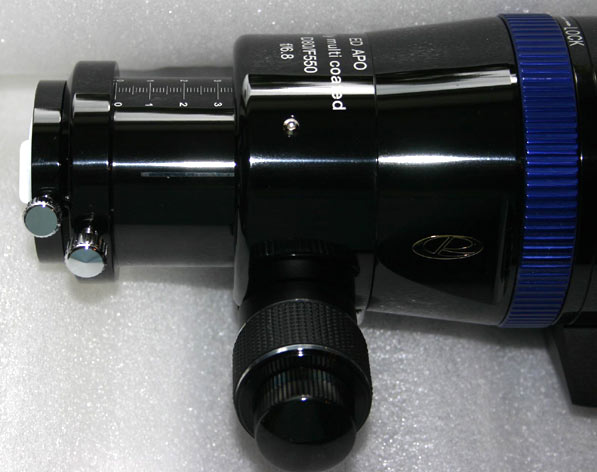
Interestingly, Astronomica: www.Astronomica.co.uk do not advertise the telescope as being an APO telescope - they call it the "80mm ED Refractor". The letters "APO" only appear on the focuser mounting "80mm ED APO" as shown in the image below.

The Astronomica 80mm ED Focuser
Image: Astronomica
Specification:
80mm, 550mm focal length (f6.8) ED (Extra-low Dispersion) fully multicoated doublet lens
CNC machined tube
Internal light baffles
Retractable dew shield
Dual–speed microfine Crayford-style focuser (1-11 step-down ratio).
2” compression ring eyepiece holder
1.25” compression ring eyepiece adaptor
Dovetail mounting show / tripod adaptor (The dovetail will fit standard “Vixen” type mounts)
Weight 6.9 pounds
Length 18”/20.75 “with dew shield retracted/extended
Foam-fitted aluminium-frame hard case with cut outs for eyepieces and star diagonals
Many colours available
I had no real idea what such telescopes should cost but the price (they are around Ł400) seemed reasonable so I bought one of the two that they had with them. It was red – fine, but I might have chosen blue, one of their other colours, had I had the choice. I knew that the “ED” meant that one element of the doublet lens was made from extra-dispersion glass, which will certainly help to reduce chromatic aberration, but “APO” – surely not. However, for my imaging application a little false colour would not be a problem and it would be a nice portable scope so I bought it anyway. (Oh yes, it came in a very nice carry case.) However, as we shall see, my cynicism was misplaced: somewhat to my amazement, I really do think that this can be regarded as an APO telescope.
So what is an APO telescope anyway?
Let’s start from the beginning. A lens made with a single element brings the colours of light across the spectrum to widely different focal points. If one focuses for green light where the eye is most sensitive, the red and blue images will be widely out of focus and the, very poor, image will be have disastrous colour fringing with the red and blue giving this a purple colour. John Dolland patented what became known as an achromatic doublet. This uses a converging (convex) element made of crown glass cemented to (or air-spaced from) a diverging (concave) element made of flint glass. The combination uses a weaker concave lens so the combination is converging and can form an image, but the false colour is greatly reduced. An achromat brings two colours to the same focus, so a wider band of the spectrum produces a good image, but the red and blue images are still slightly away from the green focus and a purple haze will be present to some extent. This purple fringing is less the smaller the aperture of the telescope and the longer its focal length.
The classic apocromat or “APO” objective uses three lens elements that bring three colours to the same focal point. If well designed, such a lens is essentially colour free which is why they are so prized. They are found in, for example, very expensive telescopes made by Astrophysics and TMB. However there is another way to produce a virtually colour free image: Takahashi developed an air spaced doublet lens in which the crown glass element was replaced by a lens made from a crystal of Calcium Fluorite. Though only a doublet lens, the variation in focal length across the visible spectrum is so small there is no obvious false colour. (A little colour fringing may be seen in out of focus star images, but this disappears when in focus and is of no real consequence.) As I can attest, as being the proud owner of a FS102, the Takashi Flourite refractors are amongst the best in the world.
More recently Ohara in Japan have produced a glass, designated FPL-53, which is virtually as good as fluorite and this has enabled air spaced doublets to be made at lower cost. When this is used, the telescope might be termed a FD or SED (super extra dispersive) APO. Ohara also produce an ED glass, termed FPL-51, which I suspect is used in this telescope. It is important to note that a FD or ED glass has to be "mated" with an appropriate glass for the second element - the better the match, the better the performance. I can only assume that the match is near perfect in the case of this objective as it seems to have got superb performance out of a ED rather than an FD glass.
It is interesting that this telescope has a slightly longer focal length, 550 mm, than some of the FD 80 mm telescopes. This will help give reduced false colour and may allow the 550 mm ED objective to perform as well as the 500mm FD apos. For perform it does.
Star testing
I tested the 80 ED on both an artificial star and on the star Rigel on a night of excellent seeing. Both tests gave the same result;
Inside of focus the diffraction rings were textbook but with a reddish region surrounding the outer diffraction ring.
Out of focus, the rings were less obvious with the outer part a pale “apple green”
In focus there was no apparent false colour in the central region of the airy disc, possibility a hint in the surrounding rings.
The rings were perfectly symmetrical when racked through focus.
Three conclusions follow from this:
1) The ED doublet is perfectly collimated and shows no astigmatism.
2) The fact that the extra-focus image is softer than the intra focus may indicate that the doublet is slightly under corrected for spherical aberration. However, when focussed outside the stellar focus one is focussing on the high atmosphere and turbulence here will tend to diffuse the diffraction pattern. I suspect that the lens is good to 1/6th wave and quite possibly better. That’s pretty good.
3) The colour fringing shown in the out of focus images is exactly as one would expect from an ED doublet – and perhaps any doublet. My fluorite doublet FS102 shows it to a lesser extent. What matters is the lack of colour in focus!
Ronchi Test
Observing an out of focus star through a finely lined "Ronchi" grating is known as the Ronchi Test. It is not as sensitive as the star test - perhaps a good thing - but can show if a lens or mirror is significantly over or under corrected and - where it works quite well - if there are regions of the lens or mirror, called zones, that do not conform to the overall shape. If all is perfect, one should see a set of parallel straight lines. If they are bowed one way or the other the optic will be either over or under corrected and, if they wiggle, the surface is not of a uniform shape and has zonal errors. The lines were smooth (which indicate smoothly polished lens surfaces), parallel (so no significant spherical abberation) and no obvious zonal errors. Fine.
Photographic Tests
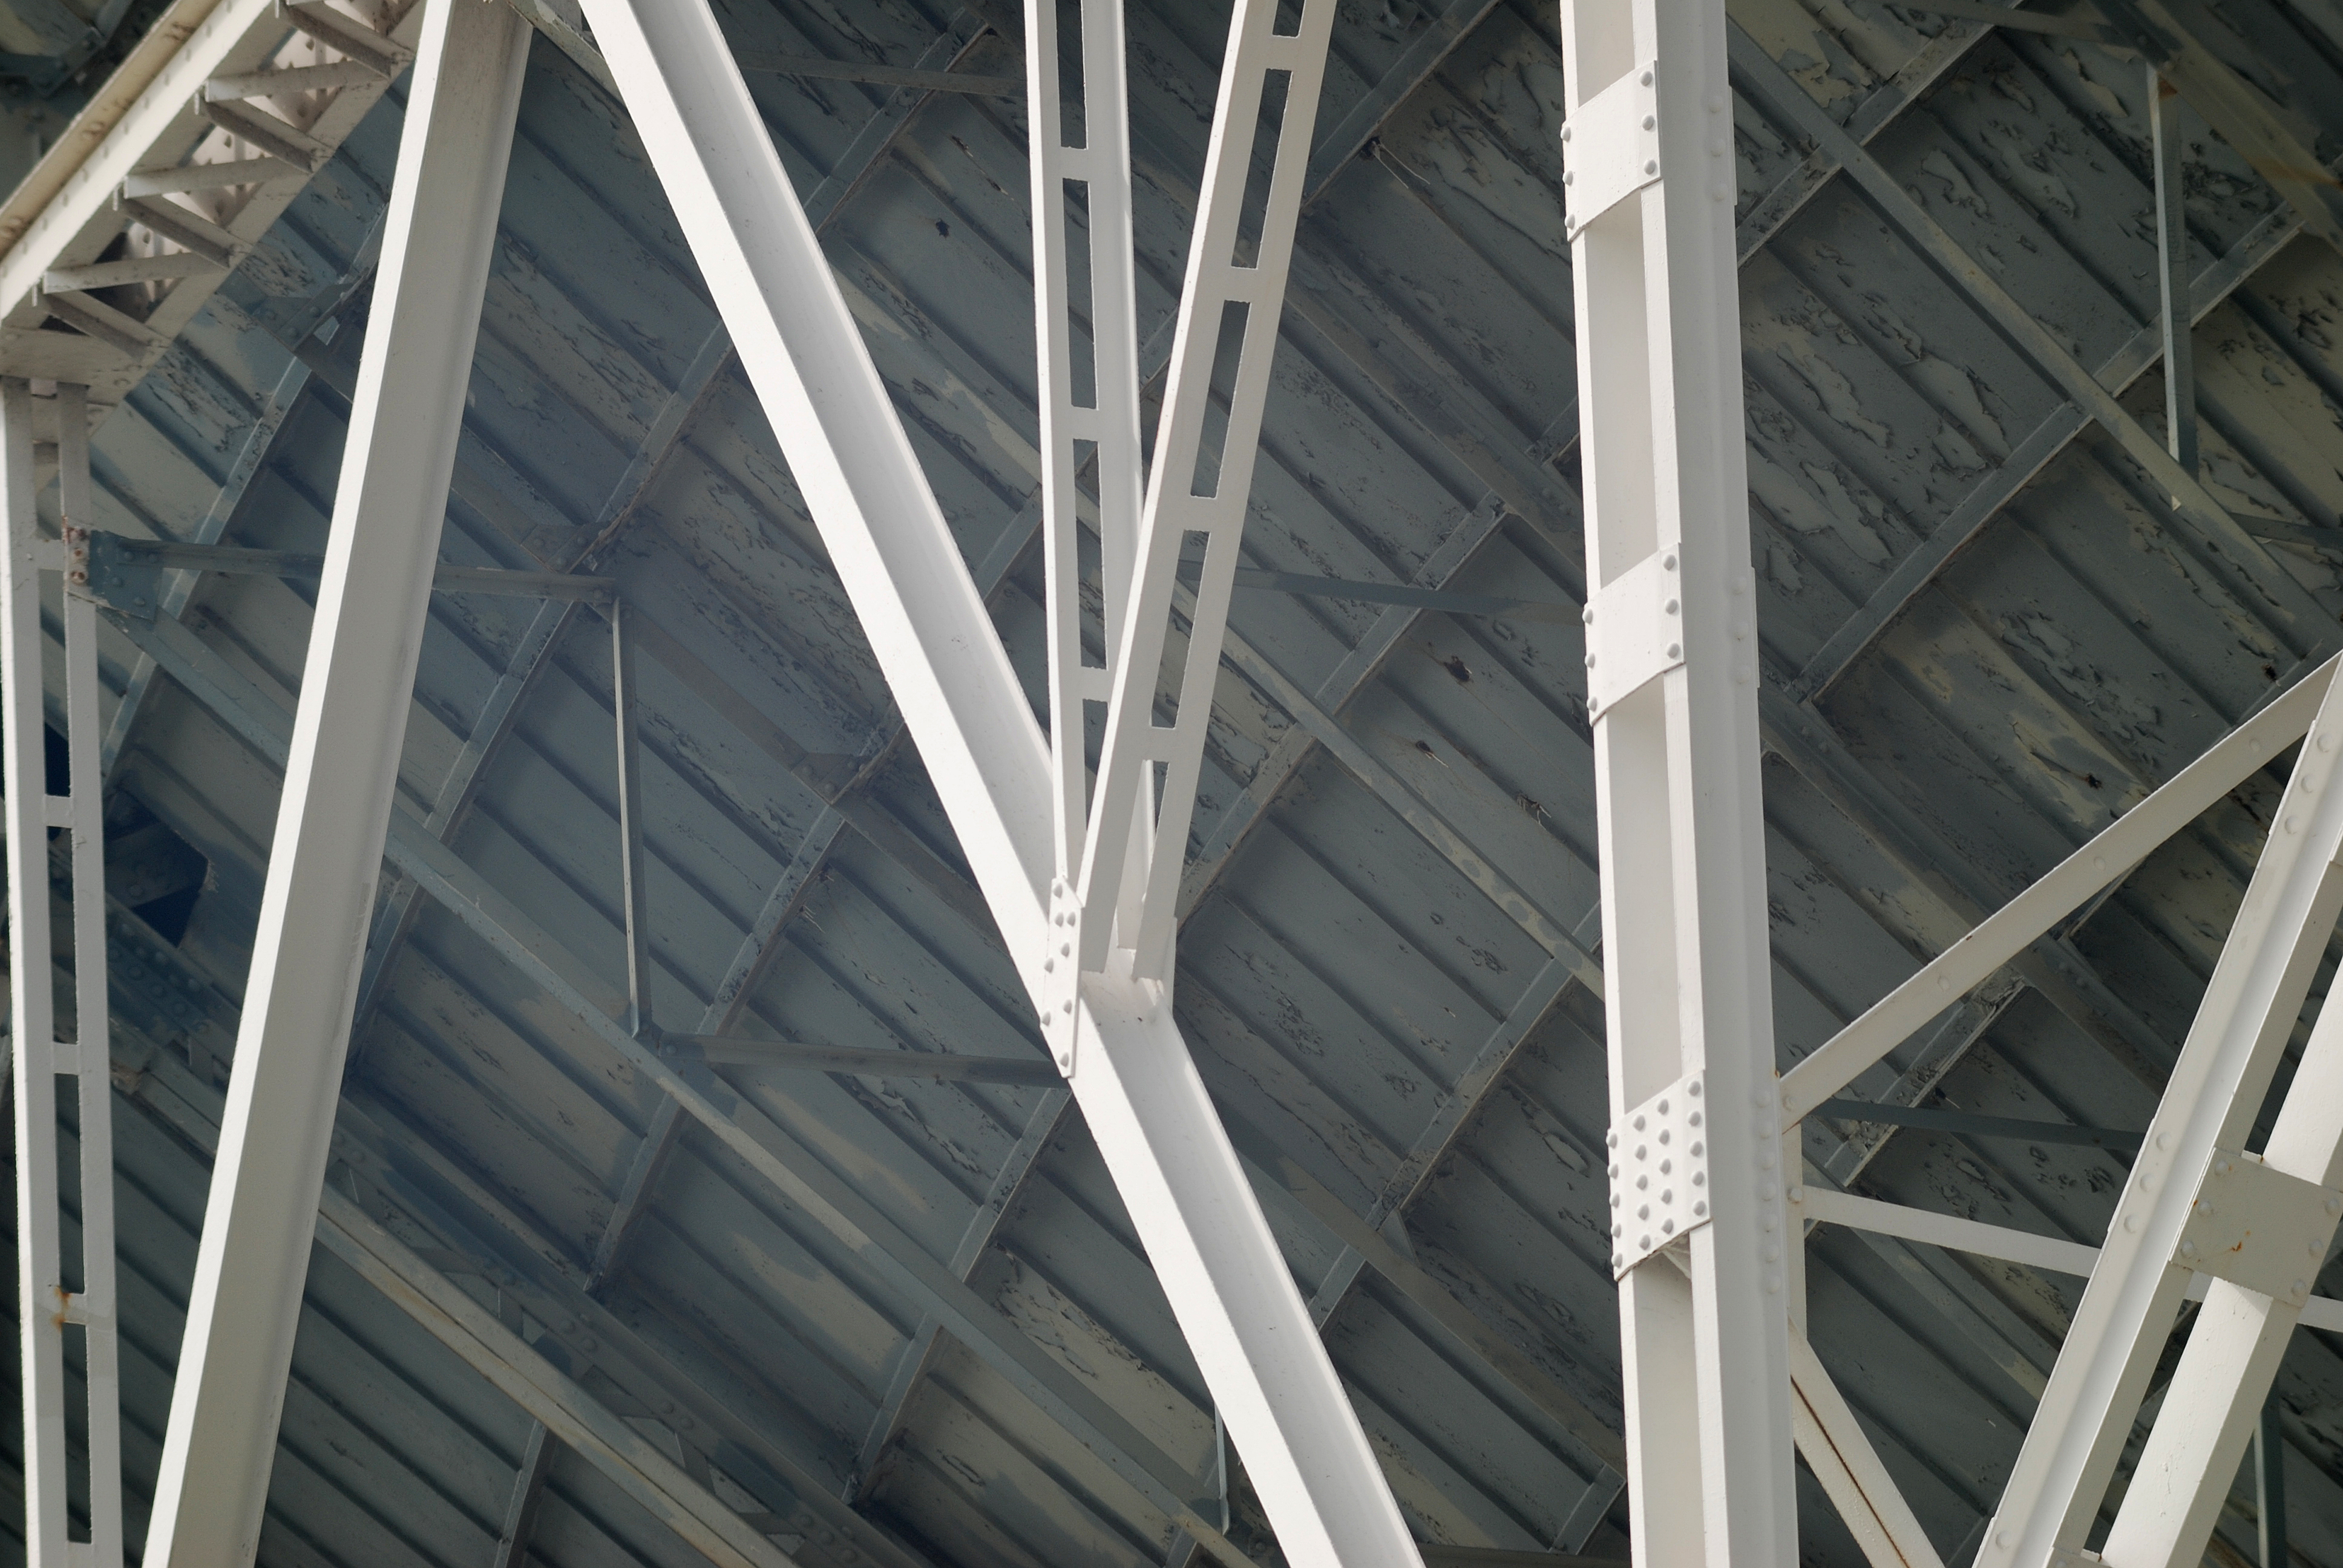
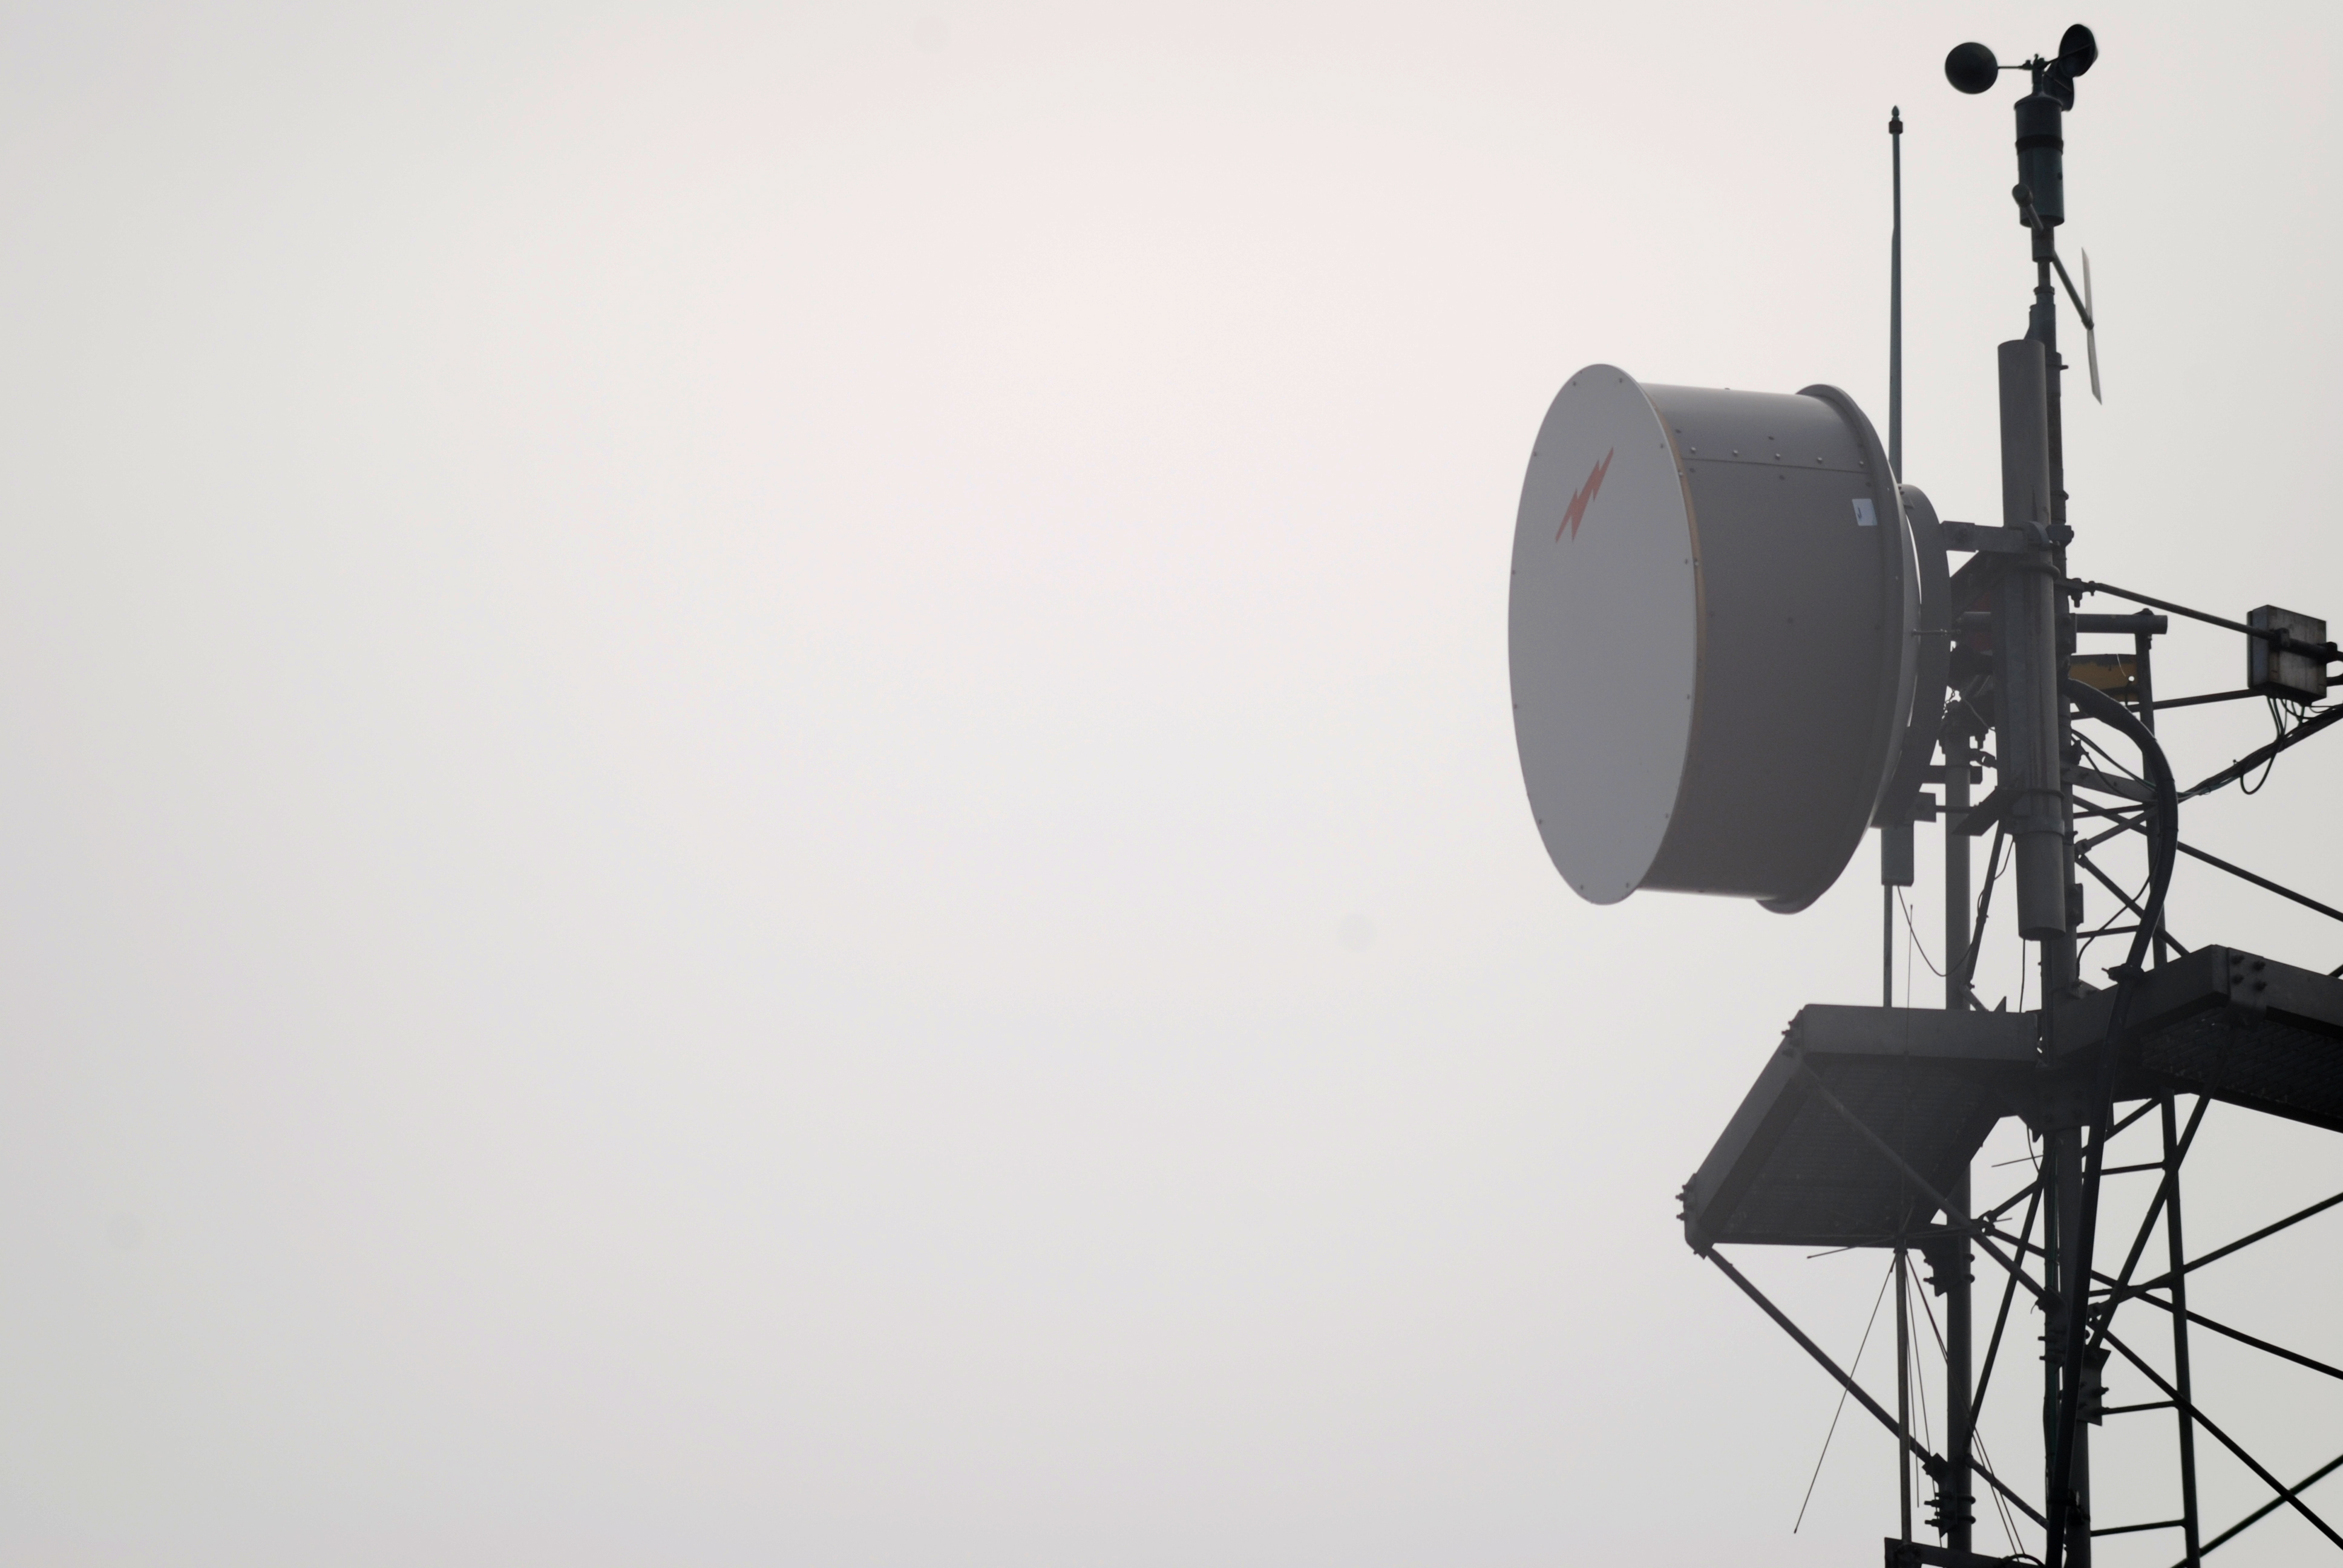
One way to show evidence of false colour is to photograph high contrast changes towards the edge of the field of view. I used the 80 Ed to photograph some structures on the Lovell Telescope and the top of a microwave link tower. These are shown below and show no evidence of chromatic aberration whatsoever.
I would be seriously worried that either my sight was failing or my critical faculties were at fault if I had not photographic evidence to back it up. I am also encouraged by the fact that at least one review on the Cloudy Nights website of the Astronomy Technologies AT80ED (which I believe to be the identical scope sold in the US) reports that no colour was observed on in-focus images with another reporting a very minor ruddy first diffraction ring on high (very) power stellar images and a slightly warmer colour than a true apo. In fact, the first reviewer says that the image is as colour free as his Astro-Physics superplanetary triplet - and you cannot get much higher praise than that.
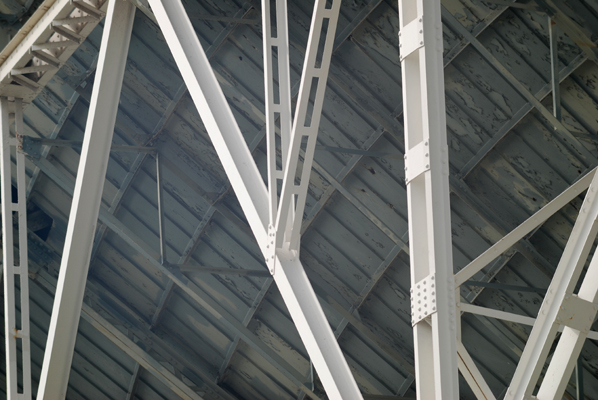
Structural steel on the Lovell telescope
ED-80 and Nikon D80:There is no colour fringing present - click for full image
Image: Ian Morison
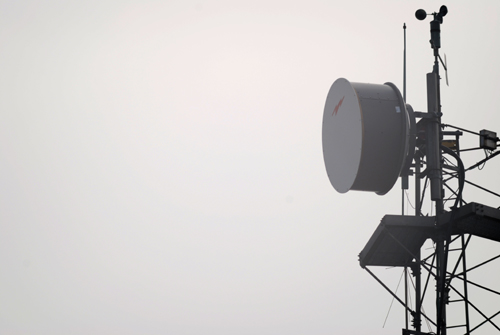
Jodrell Bank Link Tower
With Astronomica ED-80 and Nikon D80
Image: Ian Morison

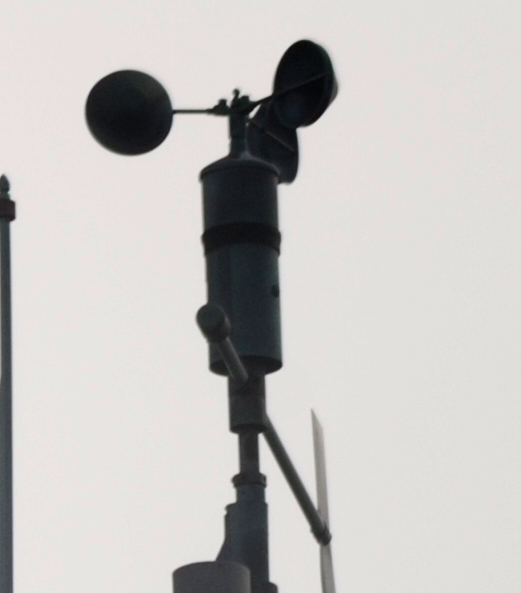
Large Scale image of the Anemometer
With Astronomica ED-80 and Nikon D80
Image: Ian Morison
Venus
Venus was dominating the evening sky when this review was being written and I observed Venus on three occasions. One does see colour - with a blue fringe above and a red fringe below the planetary disc – but this is due to dispersion in the atmosphere not the telescope. (You will probably see this the other way about as astronomical telescopes tend to invert the image.) It is possible to buy a prism based correctors to partially eliminate it. Using a green filter or perhaps a narrow filter like an OIII will clean up the image of Venus considerably.
The Moon
Observing the Moon inside focus there is a reddish limb and outside of focus a faint apple green limb is seen but, in focus, I can see no false colour or purple haze whatsoever. Below are images of the Moon photographed with a Nikon D80 10.2 Mpixel digital SLR. The first of these shows the full frame of a single exposure and suggests that a 2" Barlow might be used to increase the image scale. Both the "seeing" and "transparency" were poor so better images than this are certainly possible. Click on the image to show at full scale. The second shows a cropped stack of 4 images which have been "tweaked" a little in photoshop- again click to show at full scale. This is a "colour" image. The upper limb has the slightest tint of blue and the lower limb the slightest tint of red, but this is due to refraction in the atmosphere and not the objective lens - see comments about Venus above. Visual observations showed no colour - with a 7.5mm Takahashi LE eyepiece just encompassing the Full Moon. This is a superb eyepiece but please be aware that low cost eyepieces may well exhibit what is called lateral colour away from the centre of the field of view. This could give the Moon’s limb some colouring which is no fault of the telescope. (If using a simple eyepiece, bring the limb to the centre of the field of view when such lateral colour should be eliminated.)
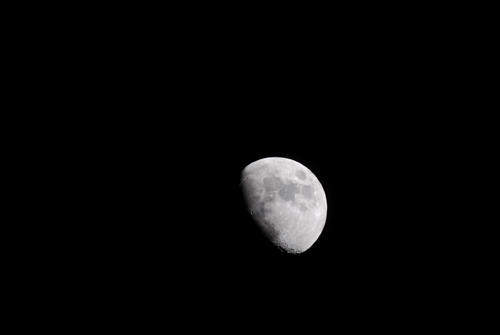
The Moon, 26th April 2007
With Nikon D80 on Astronomica 80-ED
Image: Ian Morison
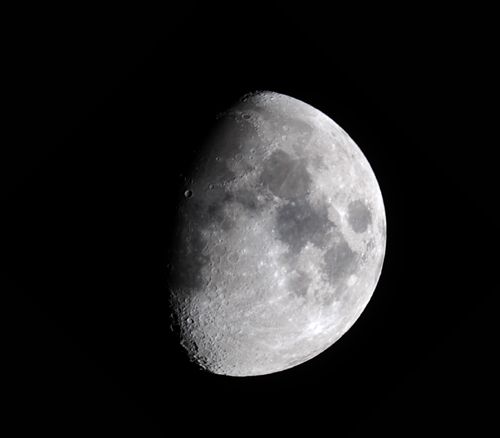
The Moon, 26th April 2007
With Nikon D80 on Astronomica 80-ED
Image: Ian Morison
In the image below the colour saturation has been greatly increased showing the differing hues of the lunar surface - rather nice. You will now be able to see the effects of refraction on the upper and lower limbs
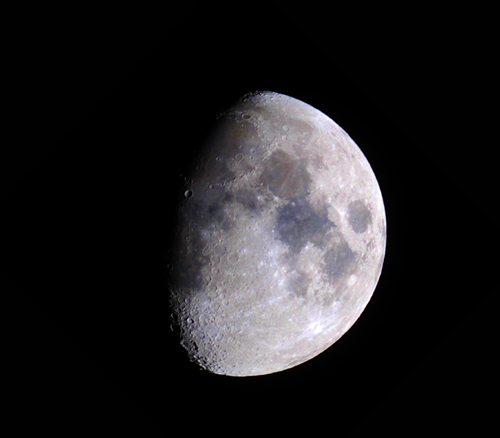
The Moon, 26th April 2007
With Nikon D80 on Astronomica 80-ED
Image: Ian Morison
This image (a stack of 4) was taken with the Moon at low elevation. It has been converted to mono to remove the obvious refraction fringing.
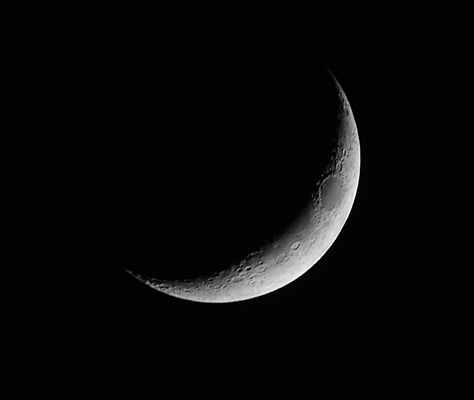
The Crescent Moon 20th April 2007
Nikon D80 Digital Camera on Astronomica 80-ED
Image: Ian Morison
Saturn
The night of the 4th April 2007 had very good seeing and I did a comparison of the 80 ED with my Takahashi FS102 whilst observing as Saturn transited due south and was thus at its highest point in the sky. The Tak image was a touch crisper and a bit brighter – both a result of its larger aperture, but there was surprisingly little in it. I do not think I saw anything with the Tak that I couldn’t with the 80 ED save one of the fainter moons.
Use as a rich field telescope.
A great feature of these telescopes is that they can give a wide field of view. As these will thus encompass a large number of stars when looking towards the milky way - they are often called rich field telescopes. The precise field of view depends firstly on the focal length of the telescope and secondly on the field stop diameter of the eyepiece. The maximum field stop diameter possible with a 1.25" eyepiece is ~ 27mm as found in the Televue 32mm Plossl. This give a field of 2.8 degrees – not bad. But to get the really wide field one needs a 2” eyepiece as these can have a field stop of up to 46mm giving a field of view of ~ 4.8 degrees – stunning! I used the ED-80 with the new TMB Paragon 40mm eyepiece, one of the finest eyepieces available today, and it makes a wonderful combination.
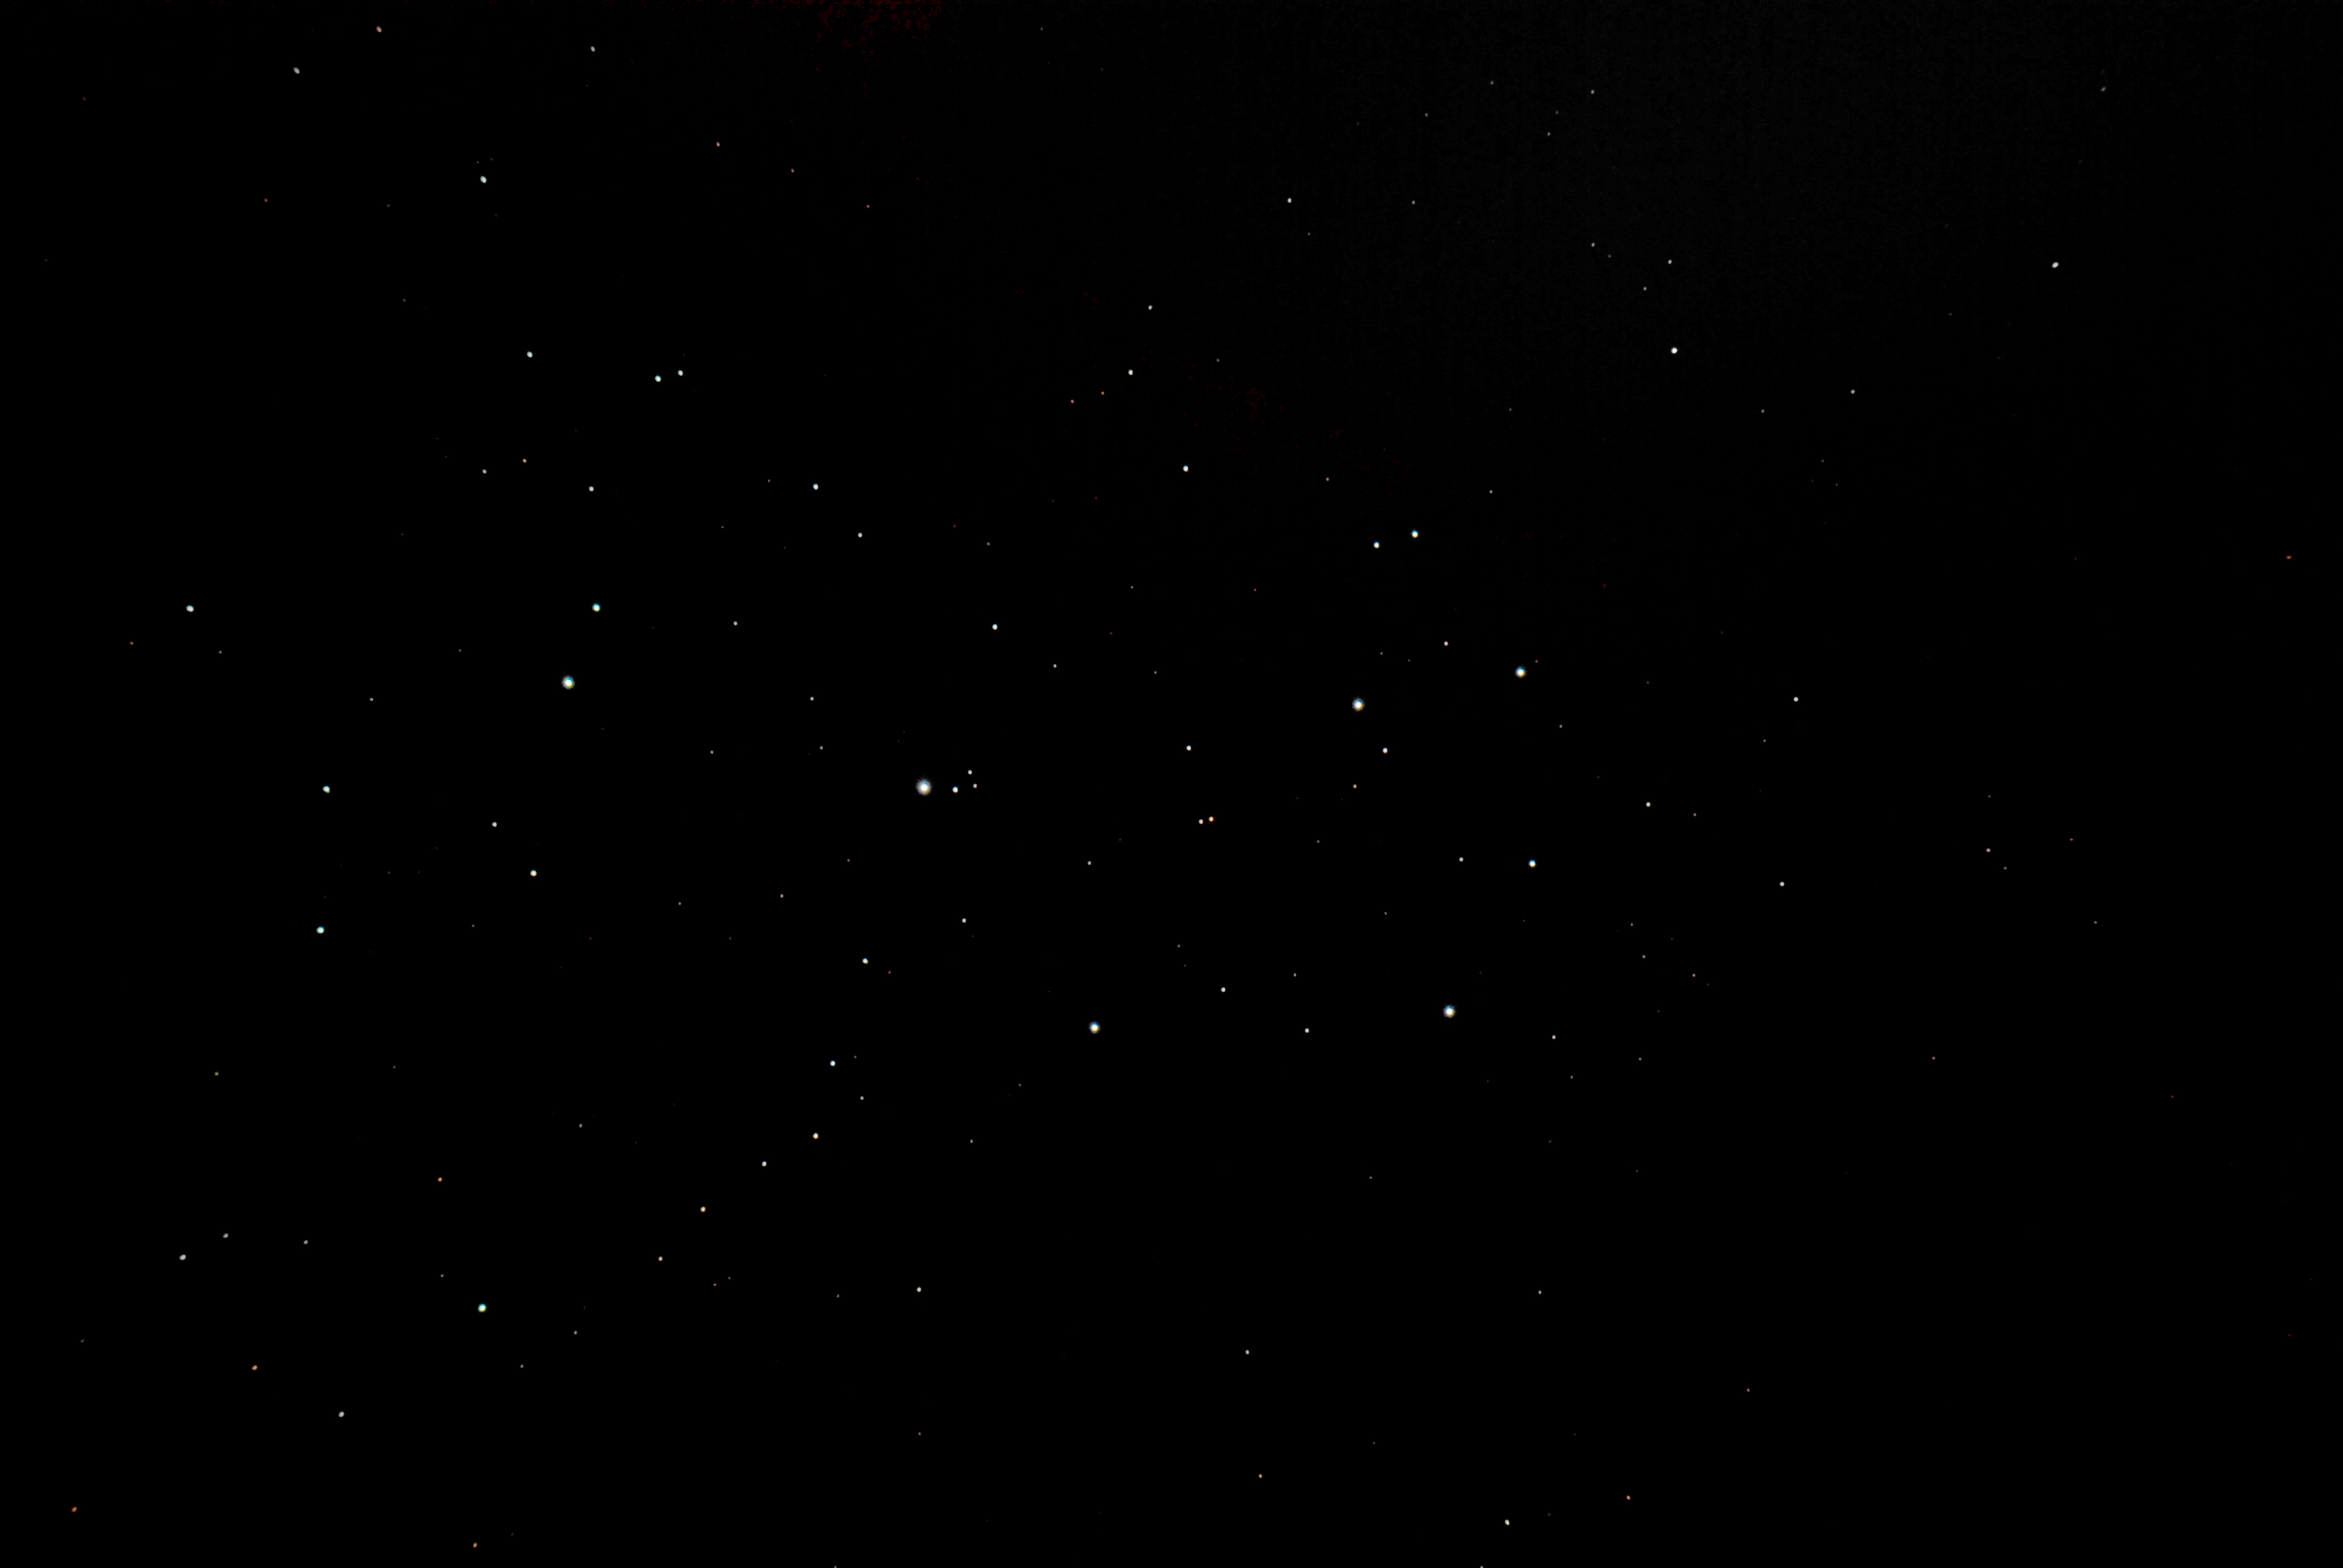
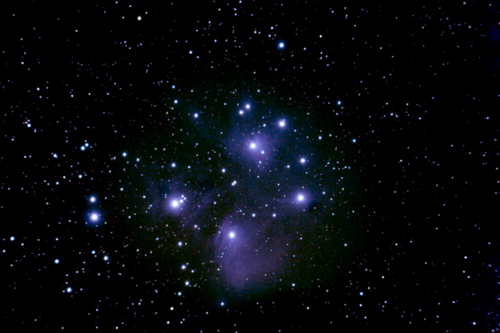
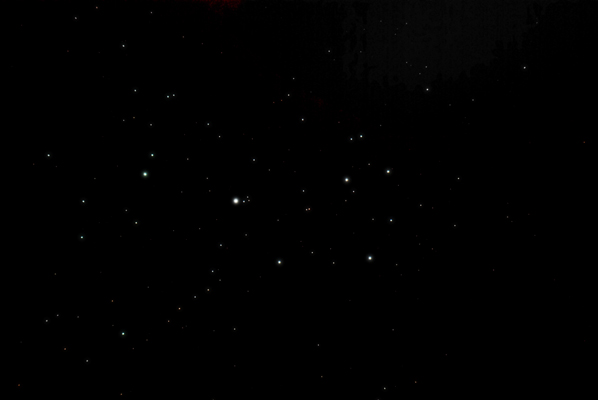
The Pleiades Cluster
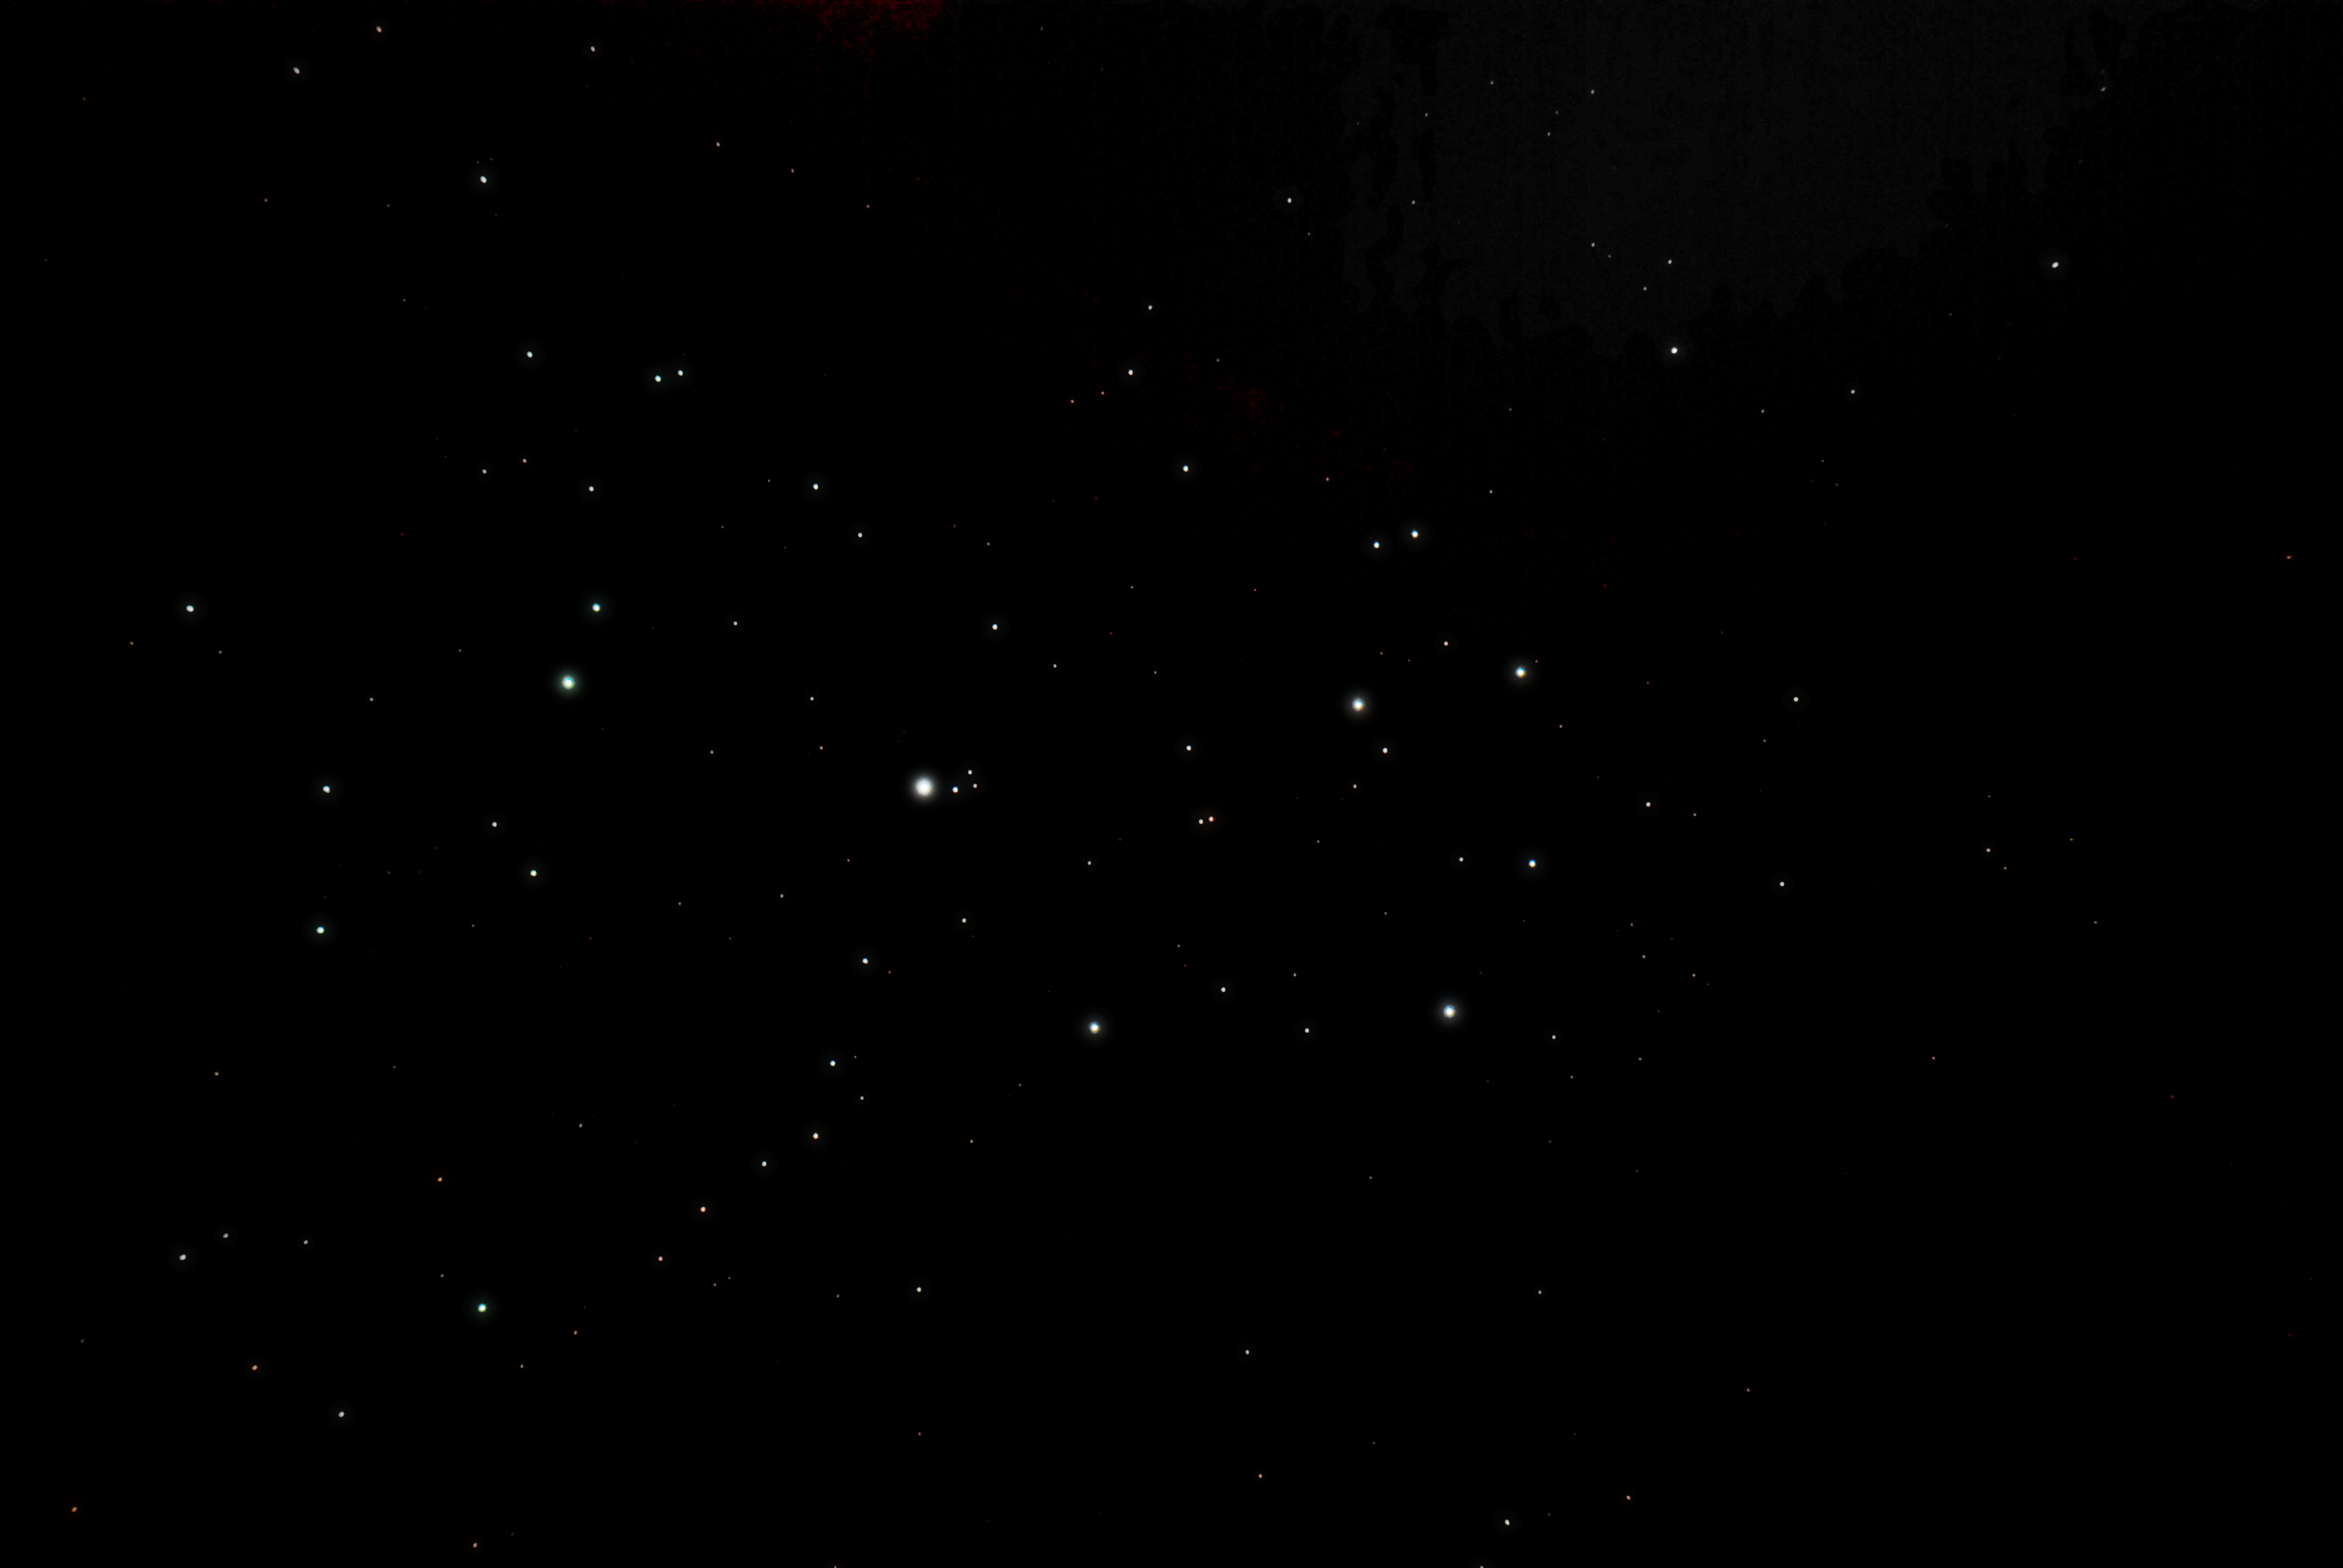
Apart from viewing the cluster with Televue 32mm Plossl and TMB 40mm Paragon eyepieces (great) I photographed the Pleiades using a Meade LXD 75 equatorial mount and a Nikon D80 digital camera. The camera has a 23.6 x 15.6mm CCD array giving a field of view of 2.4 degrees x 1.6 degrees. As the two photographs below show - which are a stack of 8 images - this is enough to pretty much encompass the Pleiades Cluster. Sadly, by the time I was able to image the cluster from a dark site in the Isle of Man, it was rather low down in the west and the faintest stars visible in the image was limited by twilight from the setting sun. I was thus unable to bring out the blue nebulosity surrounding the brighter stars. I have also posted an image taken by one of the “Astronomica” team using the same telescope which shows it beautifully.
The Pleiades Cluster, M45
Astronomica ED-80 With Nikon D80, April 14th 2007, Isle of Man
You can see that the right hand star of the double in the centre of the field is distinctly red!
Image: Ian Morison
Long Exposure showing the blue nebulosity
Image:Richard Davis, Astronomica. With permission.
A thought about film and digital imaging of star fields
Though I suspect most people would never give it’s a moments thought, images of star clusters like the Pleaides only look as we feel they should because of the failings in the photographic process. Stars are point images and, theoretically all stars, including the brightest, should give point images of the same size. The very faintest would appear less bright but the vast majority would fully expose the negative and all would appear the same brightness. We perceive the brighter stars in an image to be brighter not because they are, but because they appear larger. This is because of light scatter in the emulsion of the film which extends the area exposed by the brighter stars. In fact some photographers make the effect even more pronounced by using a form of soft focus filter in front of the lens which expands the images of the brighter stars even more.
I wondered how the move to digital imaging might affect such star images. With a rectangular grid of pixels might an overexposed star image give an odd shaped image? Well happily, as far as I can see, they do not and brighter star images are nicely round. However, I have a suspicion that digital image capture is closer to perfection than film as the brighter stars in my digital image of the Pleiades do not stand out as much as they do in the film images I am used to seeing. A little jiggery-pokery in Photoshop using the "gaussian blur" function and "levels" was used to give an image with blurred (hence larger) stellar images where only the brighter stars were visible. This image was then combined with the original using the “screen” mode and is shown below. I think the result looks a little more “film-like”.
The Pleades with some enhancement of the brighter stars
Astronomica ED-80 with Nikon D80
Image: Ian Morison
Use as a telephoto lens
Given a suitable camera adapter and digital SLR, the telescope can also be used as a 550 mm focal length lens. The fact that it has only two elements - rather than the 13 or more that a long focal length zoom might have – should give images of very high contrast and the optical performance should easily exceed that of a zoom lens. With most digital SLR’s, the CCD array is smaller than 35mm film, giving a multiplication factor of ~ 1.5, so it will act like an 825 mm lens would on a 35mm film camera. This could make it useful for natural history photography. The exposure has to be set manually using a histogram display to judge the correct exposure. The scope also has to be at the right distance from the object to frame it correctly. I decided to have a try at a local mere, photographing small birds nearby and larger birds at a greater distance. The swan image shown below makes (I trust) the point that it is capable of really nice natural history images.

Swan, Reedsmere, Cheshire. Good Friday 2007
Click for full size image
Image Copyright: Ian Morison, Jodrell bank Observatory
Summary
I hope it’s obvious that I like this telescope a lot. It is beautifully made, performs better that I ever expected, gives superb wide field images with a good 2” eyepiece and is a great “pick up and go” scope. (You may have noted that its been to the Isle of Man!) The image quality when used for natural history photography is also very impressive.
Refractors are always more expensive than reflectors, but
the the image quality of a really good one can be very beguiling! I have been very impressed in the past with the wide field views obtained with a friend's 80 mm, 500mm focal length,three element apochromat refractor coupled with the Televue Nagler 31mm eyepiece. The Astronomica has a very slightly (10%) smaller field of view due to its longer focal length, but with the superb TMB Paragon 40mm eyepiece the view is equally stunning - and the cost of scope and eyepiece is less than half that of the "full apo" scope with Nagler eyepiece. Surely that must make it good value? Highly Recommended .
Reviewer's statement
The reviewer has no formal links with Astromomica or its distributers and bought this telescope prior to writing this review. The reviewer is Telescope Adviser for the UK Society for Popular Astronomy and co-author of two astronomy books for the Amateur. He owns and uses the following telescopes:
102mm Takahashi Apochromatic Refractor.
127mm Alter 500 Maksutov-Cassegrain.
150mm Helios Achromatic refractor
150mm Meade Schmidt-Newtonian
150mm Intes Micro MN-66 Maksutov-Newtonian
200mm Orion Optics, UK, Newtonian Reflector
235mm Celestron Schmidt-Cassegrain.
Jodrell Bank Home
Page | U.Man | PPARC
| MERLIN | VLBI
| Search | Feedback